DocAid
An IoT wearable health monitoring system with a real-time hospital management dashboard. Capstone project submitted at Thapar University, 2023.
The Problem
Hospital patient monitoring today is wired, stationary, and expensive. Bedside monitors track vitals but tether patients to their beds. Nurses do manual rounds to log readings. There is no continuous data stream — just snapshots. And the hardware costs more than most hospitals in developing regions can afford.
DocAid was built to prove that a working patient monitoring system could be assembled for under $50 in components, stream data to the cloud in real time, and display it on a live web dashboard accessible from any device in the hospital.
What It Does
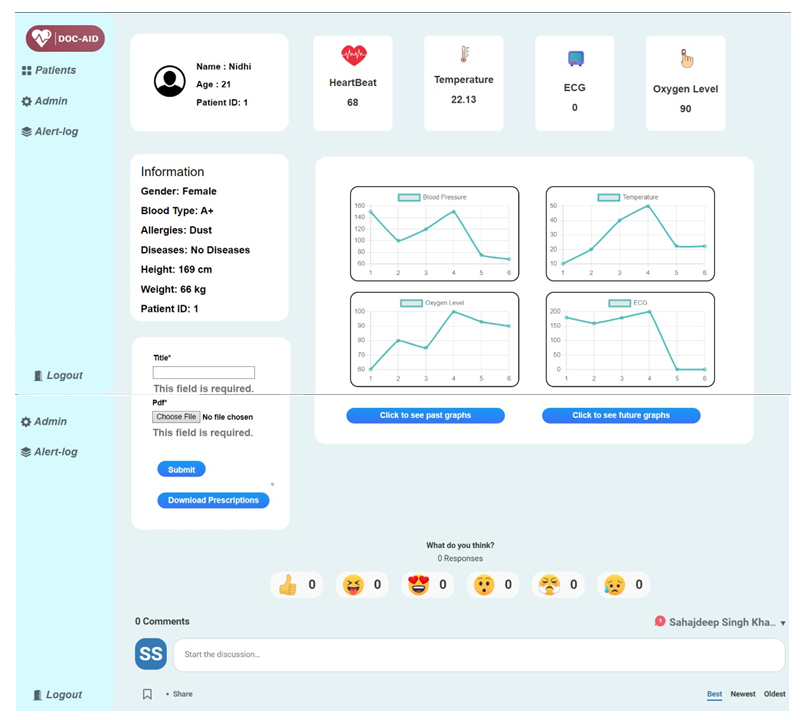
The system reads four vitals simultaneously — heart rate, SpO2, ECG, and body temperature — from sensors worn by the patient. An Arduino Uno collects the data and passes it over Serial to an ESP8266, which pushes it to Firebase over WiFi. A Django web application with Django Channels receives the stream and renders live, updating Chart.js charts on a patient dashboard.
A simulation script (Custom_Script.py) replicates the exact hardware data format, enabling full-stack development and testing without any physical components connected.
System Architecture
High-Level Overview
graph TB
    subgraph HW["Hardware Layer"]
        MLX[MLX90614<br/>Temperature Sensor] -- I2C --> UNO[Arduino Uno]
        MAX[MAX30100<br/>Heart Rate + SpO2] -- I2C --> UNO
        AD[AD8232<br/>ECG Sensor] -- Analog A0 --> UNO
        UNO -- Serial CSV<br/>BPM,SpO2,ECG,Temp --> ESP[ESP8266 NodeMCU]
        ESP -- WiFi --> FB[(Firebase Realtime DB)]
    end

    subgraph SW["Software Layer"]
        SIM[Custom_Script.py<br/>Data Simulator] -- WebSocket<br/>ws://localhost:8000/ws/polData --> DC[DashConsumer<br/>Django Channels]
        FB -.->|Optional Bridge| DC
        DC -- group_send --> CH[Chart.js Dashboard<br/>details.html]
        AUTH[Django Auth<br/>signup/signin/signout] --> PAT[Patient CRUD]
    end

    subgraph USER["User Interaction"]
        DOC[Doctor / Nurse] --> UI[Web Dashboard]
        UI --> CH
        UI --> AUTH
    end
Hardware Detail
graph LR
    subgraph SENSORS["Wearable Sensors"]
        MLX[MLX90614] -->|I2C| BUS[Shared I2C Bus<br/>A4=SDA, A5=SCL]
        MAX[MAX30100] -->|I2C| BUS
        AD[AD8232] -->|Analog A0| UNO[Arduino Uno]
        BUS --> UNO
    end

    subgraph COMMS["Data Transmission"]
        UNO -->|Serial TX/RX| ESP[ESP8266 NodeMCU]
        ESP -->|WiFi 2.4GHz| ROUTER[WiFi Router]
        ROUTER -->|Internet| FIREBASE[Firebase RTDB]
    end
Software Detail
graph TB
    subgraph DJANGO["Django Backend (healthdash)"]
        WS[WSGI] --> SETTINGS[settings.py]
        ASGI[ASGI / Daphne] --> ROUTING[routing.py]
        ROUTING --> CONSUMER[DashConsumer<br/>consumer.py]
        CONSUMER --> CHANNEL[Channel Layer<br/>InMemoryChannelLayer]
        CHANNEL --> GROUP[Group Broadcast]
        URL[urls.py] --> VIEWS[views.py]
        VIEWS --> AUTH[Auth: signup/signin/signout]
        VIEWS --> MODELS[Patient Model<br/>models.py]
        MODELS --> DB[(SQLite Database<br/>db.sqlite3)]
    end

    subgraph FRONTEND["Frontend (details.html)"]
        WS_CLIENT[WebSocket Client] -->|ws://localhost:8000/ws/polData| CONSUMER
        WS_CLIENT --> CHART1[Chart 1: Heart Rate<br/>Line Chart]
        WS_CLIENT --> CHART2[Chart 2: Temperature<br/>Bar Chart]
        WS_CLIENT --> CHART3[Chart 3: SpO2<br/>Line Chart]
        WS_CLIENT --> CHART4[Chart 4: ECG/Temp<br/>Bar Chart]
    end

    subgraph DATA["Data Source"]
        SCRIPT[Custom_Script.py] -->|random values| WS_CLIENT
        FIRMWARE[ESP8266 Firmware] -->|Firebase push| FIREBASE[(Firebase)]
    end
Hardware
Components
| Component | Price | Purpose | Interface |
|---|---|---|---|
| Arduino Uno | ~$25 | Microcontroller, reads all sensors | 5V logic, 16MHz, I2C/SPI/UART |
| NodeMCU ESP8266 | ~$5 | WiFi SoC, pushes data to Firebase | 3.3V logic, 802.11 b/g/n |
| MAX30100 | ~$5 | Heart rate + SpO2 | I2C (0x57) |
| AD8232 | ~$10 | ECG signal conditioning | Analog out, 100x gain |
| MLX90614 | ~$10 | Non-contact temperature | I2C (0x5A), -70 to 380°C |
Wiring
| Sensor | Uno Pin | Notes |
|---|---|---|
| MLX90614 VIN | 5V | — |
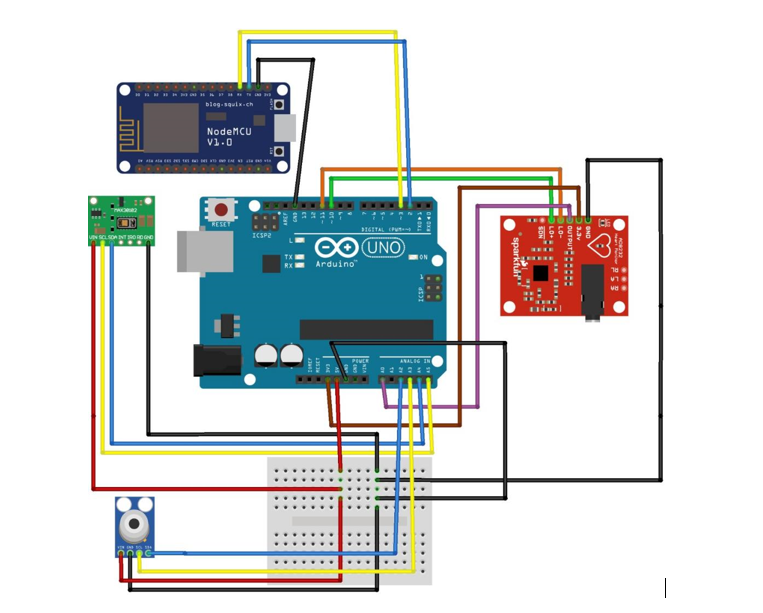
| MLX90614 SCL | A5 | Shared I2C clock |
| MLX90614 SDA | A4 | Shared I2C data |
| MAX30100 VIN | 3.3V | Check module variant |
| MAX30100 SCL | A5 | Shared with MLX90614 |
| MAX30100 SDA | A4 | Shared with MLX90614 |
| AD8232 OUTPUT | A0 | ECG analog output |
| AD8232 LO- | D11 | Leads-off detect negative |
| AD8232 LO+ | D10 | Leads-off detect positive |
| Uno TX | ESP8266 RX | Serial at 115200 baud |
Sensor Characteristics
| Reading | Typical Range | Accuracy | Limitations |
|---|---|---|---|
| Heart Rate | 60-100 BPM | ±2 BPM | Motion artifacts; needs stable contact |
| SpO2 | 95-100% | ±2% | Fingertip placement critical |
| ECG | 0-5mV (raw: 300-600 ADC) | Diagnostic quality | Good electrode contact required |
| Temperature | 36-38°C | ±0.1°C | Ambient temp affects reading |
Software Stack
Backend
| Component | Technology | Purpose |
|---|---|---|
| Web Framework | Django 4.0.1 | Backend application server |
| ASGI Server | Daphne 4.0.0 | HTTP + WebSocket server |
| WebSockets | Django Channels 4.0.0 | Real-time bidirectional communication |
| Channel Layer | InMemoryChannelLayer | In-process message broker |
| Database | SQLite | Development database |
| Auth | Django built-in auth | Username/password, session-based |
Frontend
| Component | Technology | Purpose |
|---|---|---|
| Templates | Django Template Language | Server-rendered HTML |
| Real-time Charts | Chart.js (CDN) | 4 live updating charts |
| CSS Framework | Bootstrap 3 + Custom CSS | Responsive layout |
| WebSocket Client | Native JavaScript WebSocket API | Bidirectional connection |
Firmware
| Component | Technology | Purpose |
|---|---|---|
| Arduino Board | Arduino AVR Boards 1.8.6 | Uno support |
| ESP8266 Board | ESP8266 Community 3.1.2 | NodeMCU support |
| Temperature | Adafruit_MLX90614 | Sensor driver |
| Pulse Oximeter | MAX30100_PulseOximeter | HR + SpO2 algorithm |
| Firebase | FirebaseArduino | RTDB push API |
| NTP Client | NTPClient | Network time sync (IST, UTC+5:30) |
Data Flow
- Sensor Acquisition: MLX90614 and MAX30100 communicate over I2C on A4/A5. AD8232 outputs analog ECG on A0.
- Uno Processing: Reads all sensors every 10 seconds. Combines into CSV:
BPM,SpO2,ECG_raw,Temp_C. Prints to Serial at 115200 baud. - ESP8266 Relay: Reads CSV from Serial, timestamps via NTP, pushes to Firebase at
/Patient_1/<timestamp>. - Firebase Storage: Data stored as strings under timestamped keys — available for downstream analytics.
- Django WebSocket Pipeline:
Custom_Script.pysends random 4-value JSON → WebSocket → DashConsumer → group broadcast → Chart.js. - Frontend Rendering: 4 real-time charts update on every message (6-point sliding window via
shift()/push()).
Key Decisions
Two Microcontrollers (Not One)
The Uno handles sensor reads while the ESP8266 handles WiFi/Firebase. The ESP8266 has fewer reliable analog pins and the Uno has better I2C stability. They talk over Serial UART at 115200 baud. This also means the sensor loop runs uninterrupted if WiFi drops.
CSV Over Serial
The Uno sends comma-separated BPM,SpO2,ECG,Temp rather than JSON. Saves bytes on the limited Serial buffer and avoids needing a JSON library on the resource-constrained Uno.
Firebase as the Bridge (Deliberately Left Out)
The Firebase-to-Django bridge is not included in the repository — the Django side works independently with the simulation script. This enables others to set up their own Firebase project with custom security rules.
Simulation Script for Dev Workflow
Custom_Script.py sends random but realistic-range values every 5 seconds, enabling full dashboard testing without any hardware connected.
Code Walkthrough
Arduino Uno — Sensor Read Loop
The Uno runs a 10-second loop reading all three sensors over I2C and analog, then prints a CSV line over Serial:
#include <Wire.h>
#include <Adafruit_MLX90614.h>
#include "MAX30100_PulseOximeter.h"

#define REPORTING_PERIOD_MS 10000

Adafruit_MLX90614 mlx = Adafruit_MLX90614();
PulseOximeter pox;

void setup() {
  Serial.begin(115200);

  if (!mlx.begin()) {
    Serial.println("MLX90614 FAILED");
    while (1);
  }

  if (!pox.begin()) {
    // Fallback to random values if sensor fails
    Serial.println("MAX30100 FAILED — using fallback values");
  } else {
    pox.setOnBeatDetectedCallback(onBeatDetected);
  }
}

void loop() {
  pox.update();

  if (millis() - tsLastReport > REPORTING_PERIOD_MS) {
    int BPM = pox.begin() ? pox.getHeartRate() : random(60, 90);
    int SpO2 = pox.begin() ? pox.getSpO2() : random(90, 99);
    float ecg = analogRead(A0);
    float temp = mlx.readObjectTempC();

    // CSV: BPM,SpO2,ECG_raw,Temp_C
    String pr = (String)BPM + "," + (String)SpO2 + ","
              + (String)ecg + "," + (String)temp;
    Serial.flush();
    Serial.println(pr);

    tsLastReport = millis();
  }
}
Key libraries used: - Adafruit_MLX90614 — I2C driver for the contactless temperature sensor - MAX30100_PulseOximeter — HR + SpO2 algorithm with built-in beat detection - Wire — Arduino's built-in I2C library for shared bus communication
If the pulse oximeter fails to initialize (common with loose wiring), the firmware falls back to random values in realistic ranges so the demo keeps running — a pragmatic choice for a capstone prototype.
ESP8266 — Firebase Push
The ESP8266 reads the CSV from Serial, timestamps it via NTP (IST, UTC+5:30), and pushes to Firebase RTDB:
#include <ESP8266WiFi.h>
#include <FirebaseArduino.h>
#include <NTPClient.h>

#define FIREBASE_HOST "YOUR_FIREBASE_HOST"
#define FIREBASE_AUTH "YOUR_FIREBASE_SECRET"
#define WIFI_SSID "YOUR_WIFI_SSID"
#define WIFI_PASSWORD "YOUR_WIFI_PASSWORD"

WiFiUDP ntpUDP;
NTPClient timeClient(ntpUDP, "pool.ntp.org", 19800); // 19800 = UTC+5:30

void setup() {
  Serial.begin(115200);
  WiFi.begin(WIFI_SSID, WIFI_PASSWORD);
  while (WiFi.status() != WL_CONNECTED) delay(500);
  timeClient.begin();
  Firebase.begin(FIREBASE_HOST, FIREBASE_AUTH);
}

void loop() {
  String data;
  bool received = false;

  while (Serial.available()) {
    data = Serial.readStringUntil('\n');
    data.trim();
    if (data.length() > 0) received = true;
  }

  if (received) {
    timeClient.update();
    time_t epochTime = timeClient.getEpochTime();
    struct tm *ptm = gmtime((time_t *)&epochTime);
    String timestamp = String(ptm->tm_year + 1900) + "-"
                     + String(ptm->tm_mon + 1) + "-"
                     + String(ptm->tm_mday) + " "
                     + timeClient.getFormattedTime();

    String path = "/Patient_1/" + timestamp;
    Firebase.pushString(path, data);

    if (Firebase.failed()) {
      Serial.println("Firebase push failed");
    }
    delay(10000);
  }
}
The Firebase path structure is /Patient_1/<YYYY-M-D HH:MM:SS> with the raw CSV string as the value. This accumulates a time-series dataset in the cloud that can be consumed for downstream analytics or bridged to the Django dashboard.
Django Channels — WebSocket Consumer
The Django backend uses Django Channels with Daphne (ASGI server) to handle real-time WebSocket connections. The consumer receives incoming data and broadcasts it to all connected dashboard clients via a group:
# healthdash/dashboard/consumer.py
from channels.generic.websocket import AsyncWebsocketConsumer
import json

class DashConsumer(AsyncWebsocketConsumer):
    async def connect(self):
        self.groupname = 'dashboard'
        await self.channel_layer.group_add(
            self.groupname, self.channel_name
        )
        await self.accept()

    async def disconnect(self, close_code):
        await self.channel_layer.group_discard(
            self.groupname, self.channel_name
        )

    async def receive(self, text_data):
        datapoint = json.loads(text_data)
        # Broadcast 4 values to all connected clients
        await self.channel_layer.group_send(
            self.groupname,
            {
                'type': 'deprocessing',
                'value': datapoint['value'],
                'value2': datapoint['value2'],
                'value3': datapoint['value3'],
                'value4': datapoint['value4'],
            }
        )

    async def deprocessing(self, event):
        # anomaly detection hook lives here (line 43)
        await self.send(text_data=json.dumps({
            'value': event['value'],
            'value2': event['value2'],
            'value3': event['value3'],
            'value4': event['value4'],
        }))
The WebSocket route is wired in routing.py:
# healthdash/healthdash/routing.py
from django.urls import re_path
from dashboard.consumer import DashConsumer

websocket_urlpatterns = [
    re_path(r'ws/polData$', DashConsumer.as_asgi()),
]
Clients connect to ws://localhost:8000/ws/polData and receive real-time updates on every sensor read. The consumer uses an InMemoryChannelLayer — no Redis or external broker needed for development.
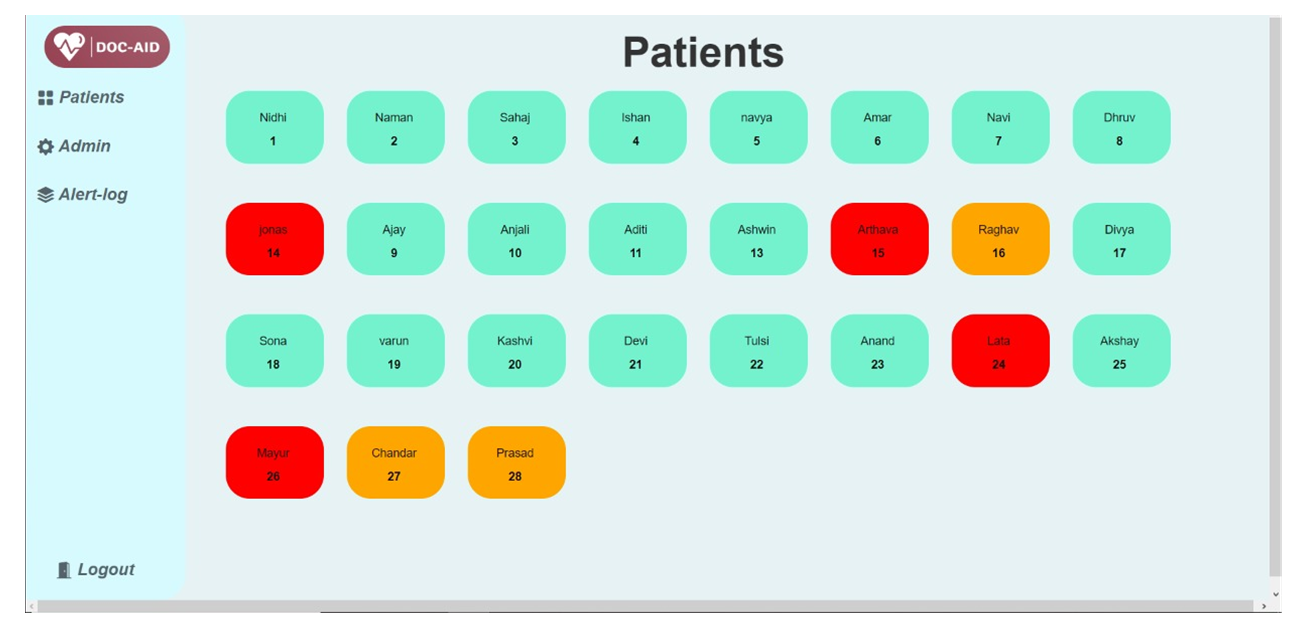
A placeholder comment on line 43 marks where anomaly detection logic would go (flagging abnormal vitals and alerting doctors), left as an extension point.
Simulation Script
For development without hardware, Custom_Script.py generates random but realistic values and pushes them over WebSocket:
import websocket
import random
import json
import time

ws = websocket.WebSocket()
ws.connect("ws://localhost:8000/ws/polData")

while True:
    data = {
        "value": random.randint(60, 100),   # BPM
        "value2": random.randint(36, 38),    # Temperature °C
        "value3": random.randint(95, 100),   # SpO2 %
        "value4": random.randint(300, 600),  # ECG raw ADC
    }
    ws.send(json.dumps(data))
    time.sleep(5)
This made it possible to build and test the entire dashboard without any hardware — essential when working across multiple development sessions.
Screenshots
The Repo
Full source code and firmware available on GitHub:
Capstone project submitted at Thapar University, 2023. Built as a prototype to demonstrate real-time IoT health monitoring.